Setting up an in-line Linux server in Azure for NIDS or packet caps
Show transcript [en]
hey good afternoon welcome to b-sides my name is ken netzorg here to introduce an inline traffic analysis appliance for use in azure and if your platform allows for it if you can do managed routing you could look to do this in your own platform as well there's a few magical there are a few options in azure but other than that you should be able to run this potentially in others so we'll step through this and your mileage may vary as you get through it but we'll see how we go so why are we here i spent some time trying to figure out how to run a tap inside of the cloud azure doesn't allow for tapping so
i needed to find a way to get in the middle of network traffic in order to evaluate what was going on and whether it was legitimate in doing the evaluation i found that there were multiple vendor appliances but unfortunately those all came with a high cost so in poking around i found out we do have the tools and so here's an introduction since i had to piece different pieces together to make it all work uh so i'll blow through it but first off who am i and why am i here talking to you i've got 25 years of experience throughout the information technology industry and i like to solve problems specifically it related so we'll keep it
to a minimum on the other aspects of it i'm currently a director of technology decisive edge here in delaware and i do have some certifications to my name so an overview of what we plan to tackle today i'll run through the architecture look at the azure objects that get implemented in order to make this work some of them os modifications then following that we'll look at monitoring traffic what the options are both from a circada zeek which was formerly known as bro and just straight tcp dump then some high availability options with the following enhancements hardening and future options for the configuration finishing off with some conclusions and questions i will be monitoring the chat channel as
we go along so if there's questions feel free to drop those in and if we run out of time hopefully it's not since we got 30 minutes to go through this we'll bounce into the q a channel afterward for any future chit chat the first the architecture what i will introduce today is going to be a simplistic virtual machine with three network interface cards one in the secure environment basically your internal one on the public side attached to a public ip address for the outbound and then a management ip on that side so we would have a network traffic pattern looking like this to the outside world from the inside world the advanced architecture i will poke at
briefly is going to add some different layers to the basic with multiple virtual machines managed through an inbound load balancer going through a network address translation gateway on the outbound side that will give you some fault tolerance and load balancing capabilities so let's get busy and build this first off uh i designed this with one virtual network split into three subnets for the appliance of the appliances i mentioned one for the secure management and public ips and then a client ip i used to get to the device in order to manage the operating system initially as well as generate some traffic so we could see it so the object compute i chose a standard b2s so one of the
critical pieces to look at is what is the size machine you need uh minimum if that's what you're looking for that actually has the ability to attach three nicks to it so in the microsoft world that would be the standard b2s there's some a's as well that allow it slightly more expensive and then you can jump into the d series on on bound if you need some more nick i see if you need more capacity for compute you can rework those as well but again the nic capacity is definitely what you're looking for second when you go to create the azure virtual machine make sure you set the nic into the outbound subnet first that definitely helps with some of the
routing complexities that will come later where you don't have to then override what that is going to look like so in your initial if you use the wizard you're going to add one nick as you go along then once the machine is up you can add two additional if you are savvy with scripting you can do that all at once i went through the wizard and just worked these two in so that provided a network map that looked similar to what you see there on the right hand side where i put eth1 the ethernet second one in the secure subnet and the third nic in the management subnet and then of course the network security
groups that get attached to those depending on how you've proceeded we'll address that shortly later so with azure they have the concept of ip forwarding that does need to be turned on at the portal level so on the outbound nick i went back in and added enabled the ip forwarding some other platforms may or may not require this it is an azure thing and i found that it seemed to only be effective on the outbound side the inbound or management subnets do not need forwarding turned on so in theory after you have done all of that from a platform perspective you fired up your virtual machine you should be able to from your client log into the
operating system so from here i launched an ssh connection from the client subnet and went to the management or sorry to the outbound nic that was my first hit again because of the routing complexities if you didn't deal with asynchronous routing going to the outbound eth0 is the first one there just to at least get logged in at that point from there you can make the next modifications that we come to so we need to tell the kernel it's now becoming a router so by default the kernel has routing turned off so a couple different options to go about that we can set it dynamically though it's not persistent by using the sys ctl command shown there and if we
want to make that persistent so it survives restarts we can actually put that into a file in the ctl directory as shown there on the screen this will then set the kernel to allow routing or sorry allow forwarding um upon restarts or you can just do both if you want to make it real time you can set it initially and also set it in the file so that does survive reboots and you do have it to play with immediately so once the forwarding is enabled we go ahead and handle the routing this is the piece that will allow us now to actually get to our management interface as well as our inbound traffic on the private subnet so
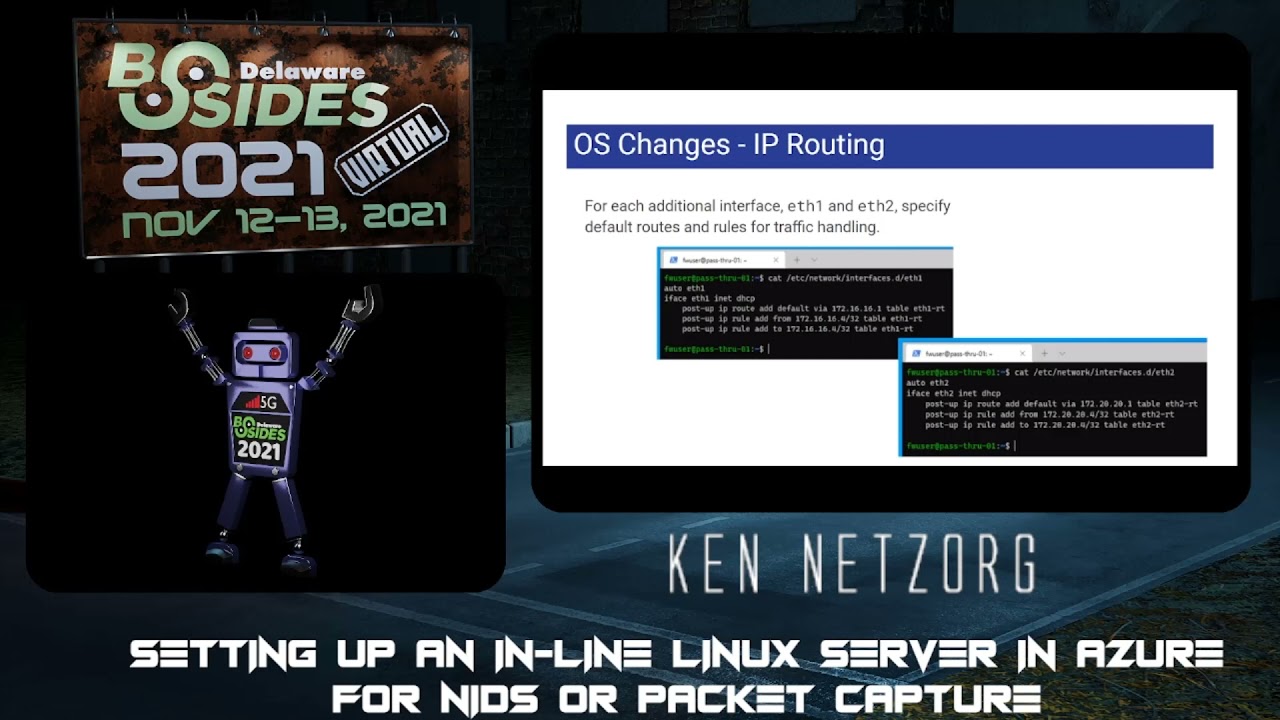
for this i just use the 201 and 202 ids within the routing file attached those to the eth1 and eth2 labels so it helped keep things a little more straight in the naming perspective so now we've defined a route table and then we go through for each interface being on the azure platform as your will based on the design manager eth0 your first nic for you so that will define the routing it'll set up all the dhcp information so we need to now go in and manage eth1 and eth2 so the settings for each of these as you can see on the screen there are setting up the route and rules so the default route within the azure
network it uses the first ip address of that subnet so in this particular case the 16.1 and the 20.1 if you refer back to the original diagram after that the rules as far as if you see a packet come in for so either from or to your interface ip address having those set properly we'll define those in the table so that way the routing rules know that when it sees traffic coming into that interface it knows that it should respond to back on that interface and that's what it'll prove for the magic as we get into eth2 which in this case is our management interface we can then connect to that one once we have restarted
so a reboot at this point definitely helps clear things up um enable the routing enable forwarding make sure everything is there and we can validate that through a quick ssh into the management ip so we switched over as you can see here we're attaching to the 20.4 ip address and we have a shell at that point so in summary as we've worked through this we have built a network that was split into three subnets i added the fourth to uh give me a client machine to both connect to and test with though it's not explicitly required in this case we added the virtual machine and we had one nic in each of the three subnets and we've
made updates to allow us to ssh into the actual management nic so with that in place we should now be able to do what it is we need to do we should be able to forward the traffic outbound so from an iptables perspective this gives us the ability to nat the traffic so do a network address translation from the inbound to the outbound iptables is a little bit varied based on your firewall distribution i have chosen to use debian for this particular example you could also be using red hat or ubuntu so installing iptables depending on the platform it could be iptables persistent or iptable services to make sure that when you restart iptables truly does start back up again
for you and then where the ip table stores its files depending on your flavor you'll want to make sure you know where that is to be able to edit that so in our case we edited on the rules version 4 the rules.v4 and that gave us the ability to add the nat chain since iptables is broken up into different chains so here the network address address translation chain we added a post routing rule that says the outbound ethernet 0 we're going to do a source network address translation and that is going to be the to the ethernet address that's on your outbound interface so in this particular case it is 30.4 we also added a filter chain that
basically said hey anything coming into iptables we are going to accept so we add the forward option on our inbound eth1 and tell it we're going to accept it so for many you may cringe as we are accepting everything we're not implying any firewall rules in this particular case so the benefit is being in a cloud we can apply the network security groups or acls depending on your platform around that network interface not being on the host so instead of managing it at the ip tables level we'll use the nsgs or acls to manage the traffic at the platform level one less spot to manage it and manipulate it when you need to add a new
port for outbound so once the ip forwarding and routing have been put into place we need to modify the platform in order to generate and send traffic directly to our interface so in this particular case for azure we did a ip routing rule their default route is the quad 0 0 and then we would specify the next hop as the ip address of the appliance we just created so that would be the inbound secure nic in this particular case we had it at the 16.4 address we can then assign that to any subnet we need to in this particular case we were going to assign it to our client subnet that we created as well early on
and that then allows that client when it sends any traffic outbound especially to the internet it will be sent through our server here that we just created so what can we do now that we've got traffic being sent to our appliance what is it initially we can take advantage of so running a tcp dump is the first way to really validate that your configuration is working we can run the tcp dump running an interface any uh definitely helps make sure that you both get the inbound and the outbound traffic so both the uh eth0 and eth one traffic so it's going both in and out in this particular screenshot don't forget that if you are doing this from
the client that you're also managing tcp to um you might want to exclude port 22. otherwise you're going to get a nice reverb on that one with lots of traffic back and forth so you'll see that in the screenshot but generally if you're going to test that on a different client that's not also ssh in you can limit that to simply the traffic so that's tcp dump suricata actually has a specific section within their system and that in within their documentation that shows how to configure an inline ciracata network so it's actually pretty simple by adding a single line to your ip tables that we've already worked on and that is just sending it to the nfq
that you can see there that is configured and set up within cerakata so everything else pretty much remains the same follow the documentation within cerakata and then from there add the simple line to your ip tables restart ip tables and away you go you now have a full inline working cerakata system zeek is another fabulous tool that's out there i do have uh some experience running this minimally in line to monitor traffic from point a to point b but uh this being an overall cluster diagram as you see there on the screen showing the difference between the taps the front ends the workers and the managers for this particular case this integration and configuration would
basically be the tap the front end and the worker all combined so you would need to modify your configuration to send the traffic off to the manager machine once it's done however it should work to monitor the traffic ongoing pf ring would probably also be suggested in order to make sure you can get the throughput and volume simplistic testing i i have not found that the need for pf ring is there but if you take it higher scale pf ring definitely would be worth looking into and so you can see the links to the zeke pages onward discusses the cluster setup so those are the basic uh pieces in order to get to a network traffic
monitoring either with cerakotta or with zeek and so that to date however leaves us a little suspect we need in order to make this more high performance should we be putting any bigger loads behind it make sure that we put in a load balancer to make sure that we have redundancy and or scale so if we need to add more systems to our design or if we need to increase our capacity or actually do maintenance and do restarts should we only have a single machine anytime we restarted that machine we would be cutting off traffic to the outbound world so azure allows us to do it in an inbound load balancer you can use a basic
what they call a skew or a standard sku would give you a little more sizing with that one plus if you for a standard sku if you are going to be traversing different virtual networks that would definitely come in handy there are some limitations with a basic load balancer keep in mind with an inbound load balancer there are some challenges that come along with this one it does use a polling heartbeat that's either set to tcp or http to know if that appliance is healthy and allowed to basically be routed to from a traffic perspective so something will need to be on the service listening on your appliance that would respond to that one the additional piece with an inbound
load balancer is you would need to specify each port that is going to be allowed through that load balancer so 80 443 dns traffic ntp depending on where you're getting your timing from smtp different options there that go along with that so keep that in mind as you are building routes out through that that you capture those different ports there's no need to swap the ports if you're sending it from 80 you can map it straight onto your load your inline appliance at 80. we did not make any restrictions as you recall on the firewall so it should be listening across all ports we just left it at the interface level and then overlaying the network security groups
uh there are some hiccups and challenges that you might face with that one the last time i worked on that one simply putting a network security group in this in the path on the secure network did uh basically break the communication between the load balancer and the uh network interface so there's some work to be done with that piece of it and the standard sku though might change that one a little bit another piece that has recently come up that microsoft has introduced is an inbound gateway load balancer so this one is a little more broad keep in mind though it is in preview so in order to set that one up you would need to opt into the preview
for it the other option is just keep an eye on it and know it's out there the goal with this one one of the things that made it intriguing is that you can chain different appliances together and you can as they say in the documentation you can integrate virtual appliances transparently into the network path so where in the past when microsoft dove into the network taps they tied you specifically to a third-party vendor in this particular case it seems as though they are going to allow you to use a custom appliance ie what we just built as the back end and you can say as the documentation states you can easily add or remove appliances as well as scaling so keep
that in mind keep an eye on that one it might be of value in the future and provide a little bit more benefit than a standard simple inbound gateway or an inbound load balancer the so that handles the inbound and allowing for scaling at the on the inbound side from an outbound side microsoft has said their preferred or at least i guess their best as they state out is the network address translation the nat gateway however i'm still scratching my head the pricing and sla states that their data path is at least 99.9 percent available so just for you guys watching there at home i did put that down in the bottom right hand corner kind of small but that
means you've got 10 minutes of outage time a week if that's okay with you i guess 99.9 is your friend um so i don't know i'm not quite sure how this can be their best solution with a three nines um we'll see where that one goes but those are the other options in the box there for what is allowed uh or what i guess options are for outbound ip addresses considering this is the best um it works the other option is for those familiar with the azure environment would be to use another load balancer behind another ip address so that actually fans is a reverse proxy basically on the outbound side so those are kind of the two major
reasons or major tools you could use on the outbound side but the nat gateway hopefully they improve their slas so here we are next steps and considerations we've kind of discussed so far setting up the virtual machine we've discussed uh what we can do to monitor the traffic uh how to make this slightly more high performant than the just the basic appliance and what other things that might be gotchas with this process so as i mentioned earlier we have network security groups through those by default just some of the basic ideas would be on the public putting a network security group on the public subnet and only allow outbound so basically block everything inbound there should be
no need for one nick to communicate with another or any traffic to be inbound so you can pretty much deny everything inbound keep in mind it is stateful so any traffic going back out would be allowed back in but you wouldn't need to accept any inbound unsolicited traffic the secure channel on the secure nic definitely would be ideal to put a network security group there keep in mind that it might take a little bit of trial and error to get that network security group up and going even though the load balancer would be allowed through there by default uh and then you have the third nick which would be the management nick definitely with that one limit your
connections into that subnet from anything you trust and ssh block everything else at that point so that we should take care of your your security from a platform perspective and network traffic then of course you have ssh this one in theory should be listening on eth2 one of the challenges i found is with the load balancer if it needs a heartbeat the question is going to be what is actually running on that appliance to respond to a heartbeat so ssh for better for worse you can run on a separate port might be one option for a heartbeat to answer uh suggestions if anyone else has anything else definitely might be interested in seeing what there
is but adding more services only increases the footprint and complexity and risk at that point so keep that one in mind the other issue is if you don't install 22 ssh on the inbound which might be ideal should you ever have to send ssh through the device you don't want the ssh daemon on this particular appliance listening and responding you want that ssh traffic routed through the appliance not responded to so you might need to update the ssh daemon keep that one in mind as you're progressing through your installation enough tables for those familiar with the linux world we are turning a corner iptables is uh on its way out and if tables is uh
coming around um it's a little more complex to set up i have not yet had the pleasure or pain of dealing with converting this installation into a network tables uh format so unfortunately i don't have anything to give you at the moment from a configuration perspective maybe in time i'll get that out there so wrapping this up hopefully this has been helpful um we've shown that you can build your own appliance using some cost-effective resources at the end of the day it's the cost of the virtual machine in the azure world throw a reservation on it and you probably have something that you can use for about 40 bucks a month far better than just about anything
you're going to find out there that's commercially viable at hundreds easily per month the appliance can be outfitted with your own product that you choose so again choosing open source circada or zeek you could even tie that into a security onion feed that stuff into a rita um or your other ac hunter to monitor your traffic and then using different cloud services you should be able to increase the availability and throughput so you don't have you're not relying on just that one device serving that up hopefully that's been helpful if there's any questions or comments definitely uh monitor the q a channel so with that if you need to contact me i wish you luck on your hunting and getting it up
and running i am zorg the blue on the discord channel and i will try and post something out there on the github that i've got i don't have these slides up there yet but i'll work on putting something together before too long but hopefully that's been helpful and appreciate everybody's time
you
Related talks
 31:02
31:02 28:25
28:25 48:45
48:45 57:35
57:35 22:25
22:25 40:35
40:35